
[bannerTop]
Welcome to our Pushwhy.com “Virus” removal guide. The following instructions will aid you in removing the unwanted software from your PC.
If you have browser-related issues that involve the uncontrolled generation of advertisements on your screen and frequent redirects to promotional pages and sites that try to sell you something, you should consider the possibility of having a hijacker inside your browsing program. Other symptoms related to this type of apps include changes in the way your browser operates as well as modifications in its search engine tool, its toolbar and maybe its homepage and new-tab page addresses. This is all aimed at turning your browsing program into an advertising platform and swarming your screen with annoying ads that are used in Pay-Per-Click schemes.
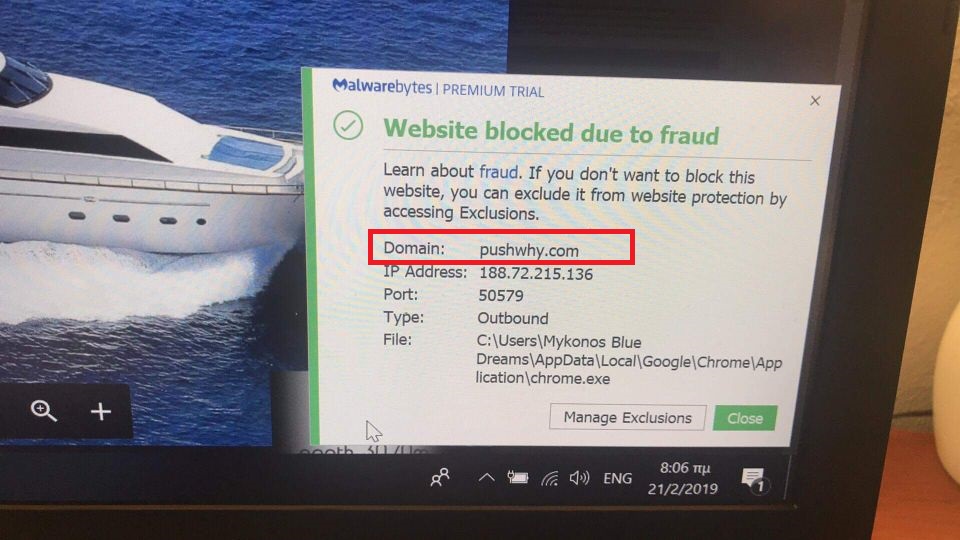
The targeted browser could be Chrome, IE, Firefox and, as of recent, many Safari users have also started to have complaints from such hijacker apps. The main problem that users have with this kind of software is that it will greatly obstruct your ability to surf the net normally and to reach the sites and the information that you want to reach. This, however, is actually not the actual biggest issue related to hijackers. An even greater problem is the fact that not all of the ads you may see getting streamed on your screen would be reliable and safe. This means that if you happen to click on a certain advert, banner or page-redirect link, you may actually find yourself getting redirected to a site or a page with harmful contents or maybe Ransomware or Trojan Horse infections. The hijacker, itself, isn’t really a dangerous app – it’s not like Trojan Horses, Rootkits, Spyware or Ransomware, but removing it is still important if you’d like to keep your system out of trouble. Pushwhy.com is likely the name of the hijacker that brought you here and this is why the following removal and uninstallation guide will mainly be focused on its removal. Use the instructions that we are about to give you and remove Pushwhy.com “Virus” with their help if you want to put an end to the unpleasant activities in your browser.
Distribution methods used for spreading Pushwhy.com “Virus” and other hijackers
Many of you that have Pushwhy.com inside their machines may be wondering what has actually brought this app to their computers. The reason why most customers don’t normally realize when and how a hijacker got installed is because the majority of apps like Pushwhy.com “Virus” do not get distributed as separate pieces of software bur rather as bonus components bundled with other programs. A hijacker would, for example, be typically added to some free program or update as an added bonus element that would only be disclosed under the Advanced/Custom settings menu – a menu that most people don’t typically pay attention to. This is actually a very common mistake – not checking the advanced setup settings and installing everything through its default setup configuration. In fact, this is likely how you have landed Pushwhy.com as well. So, if you don’t want any such hijackers getting added to your system in the future, remember to always check the Custom/ Advanced settings menu especially if you are about to install some free piece of software on your computer.
Remove Pushwhy.com “Virus”
I – Safe mode and revealing hidden files
II – Uninstallation
[bannerMiddle]
- Use the Winkey+R keyboard combination, write Control Panel in the search field and hit enter.

- Go to Uninstall a program under Programs.

- Seek the unwanted software, select it and then click on Uninstall
If you are unable to spot Pushwhy.com, search for any unrecognized programs that you do not remember installing on your PC – the unwanted software might disguise itself by going under a different name.
III – Cleaning all your browsers
- Go to your browser’s icon, right-click on it and select Properties.

- Go to the Shortcut tab and in the Target make sure to delete anything written after “.exe”.

- Now, open your browser and follow the instructions below depending on whether you are using Chrome, Mozilla or IE.
- Chrome users:
- Go to your browser’s main menu located in the top-right corner of the screen and select Settings.

- Scroll down, click on Show Advanced Settings and then select Clear browsing data. Just to be sure, tick everything and clear the data.

- Now, in the left pane, go to Extensions and look through all extensions that are integrated within your browser. If you notice any suspicious add-on, disable it and then remove it.

- Firefox users:
- Similarly to Chrome, go to the main menu and select Add-ons and then Extensions.
- Remove any suspicious browser extensions that you may have even if they do not have the name Pushwhy.com on them.
- IE users:
- Go to Tools and select Manage add-ons.

- Click on all add-on types from the left pane and check if there is anything suspicious in the right panel. In case you find anything shade, make sure to remove it.
IV – Removing Shady processes
[bannerMiddleSecond]
- Go to your start menu, type Task Manager in the search field and from the results open View running processes with Task Manager.

- Thoroughly look through all processes. The name Pushwhy.com might not be there, but if you notice any shady looking process that consumes high amounts of memory it might be ran by the unwanted program.
- If you spot the process ran by Pushwhy.com, right-click on it, open its file location and delete everything in there. Then go back to the Task Manager and end the process.

V – DNS check
- In the start menu search box write View Network Connections and open the first result.

- Right-click on the network connection you are using and go to Properties.

- Select Internet Protocol Version (TCP/IPv4) and click on Properties.

- If Obtain DNS server addresses automatically is not checked, check it.

- Go to Advanced and select the DNS If there is anything in the DNS server addresses field, remove it and click OK.

- Click OK on the rest of the opened windows.


Leave a Reply