
This guide will help fix Windows Update Error 0x80070543. The guide works for Windows 10 and earlier versions
Nowadays more and more users are complaining about problems with the updates that they download and try to apply to their OS. The error code that appears is the 0x80070543 error. This issue first appeared in the Windows 7 OS. Then it started occurring in the Windows 10 OS, as well. Such a problem can be solved. Nonetheless, if you also consider the fact that Windows 10 is still a work in progress and its final release is not ready yet, this issue might be even more serious. Being unable to apply the newest updates to your system via Windows Update could really be bothering.
The following article contains important details about the potential reasons for such a problem, as well as a functional guide that will help you get the Windows 10 Update Error 0x80070543 solved. Still, what is very inexplicable is the fact that Microsoft hasn’t found an official solution for this quite common issue yet. Another odd aspect of getting this particular error notification is that there are no clear signs of any problems and it is rather unexplained why the updating fails.
Luckily, simply by following the instructions in the guide below, you should be able to get the error fixed, no matter what your operating system is. It works for both Windows 7 and Windows 10. Just make sure that you apply all the mentioned operations below and you should no longer experience such update failure.
Windows Update Error 0x80070543 Fix
The Guide
Beware of an important detail about performing the instructions below. They involve working with an important component of Windows. Basically, this means that doing something the wrong way or modifying the wrong component might result in much more dreadful consequences for you and your system. To be completely precise, messing up the steps below may even be the reason why reinstalling the operating system may be needed later. Be extremely cautious!
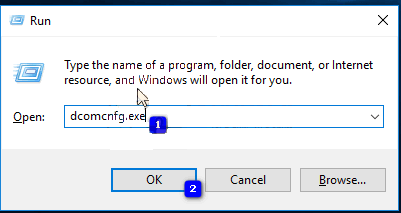
- Select the Windows and R keys on your keyboard. In the Run window that comes up, enter dcomcnfg.exe in the Open dialog. Then select Enter again. You can simply choose OK as well. It will work both ways. In case you see a UAC prompt, push OK.
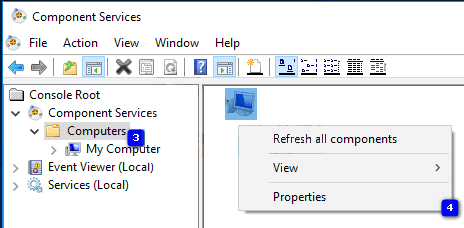
- Use the left-side navigation pane to enlarge Component Services. After that enlarge Computers. There you will notice the My Computer directory. The next thing you have to do is to right-click on it. From the hanging options that are generated, click on Properties.
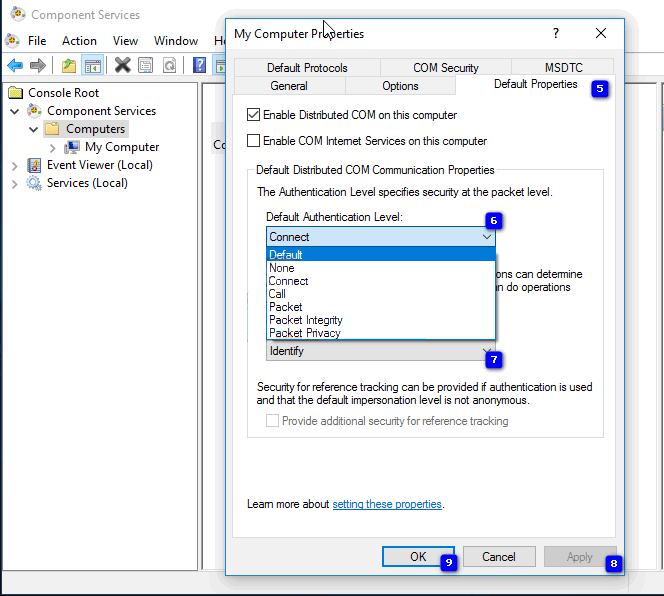
- Proceed with going to the Default Properties. In case the Default Authentication Level‘s chosen option is None, open the list and change it to Connect. In case None is not the preferred option, don’t alter anything, an administrator might have set it that way. From the Default Impersonation Level list, click on Identify. Press OK. After that continue with Yes to apply your settings. Exit the Component Services window.
The aforementioned instructions are to help you resolve this unpleasant issue. As soon as you have implemented them, the error shouldn’t bother you again and you should be free to install Windows Updates.


Leave a Reply