
This guide will help you fix the Igdkmd64.sys BSOD, which continues to plague Windows 10 users. The instructions provided mostly work with older versions of Windows as well.
The article you will read below deals with the error message connected with Igdkmd64.sys BSOD – the driver for the Intel Graphics Kernel Mode, also known as igfx. It contains some solutions in the form of guides that are supposed to get that unpleasant issue solved for you.
Where, when and why could Igdkmd64.sys error appear?
Igdkmd64.sys is by no means a new error in the Windows scene and it appears to occur just as frequently on Windows 10.
This specific driver has been developed by Intel and only systems with a processor made by Intel could experience such an issue. The problem itself represents a Blue Screen of Death together with an error notification stating this driver is not working properly. In fact, such an issue might result from nothing – there could be no reason for it. Some Mac users might also become victims of such a problem. Fortunately, we have provided a few useful guides below that could be just the right thing for your case. Hopefully, by following the steps inside them, you will be able to get rid of this problem.
Igdkmd64.sys – a Windows 10 Fix
The Guide
Guide #1: Steps to disable Intel’s integrated GPU
The instructions in the following guide will only work for users, who have discrete graphic cards. Examples of discrete cards are AMD or nVidia. Actually, the instructions below represent something more of a workaround than of a fix. However, in case you don’t really use Intel’s GPU, you are not going to spot any differences.
- Turn off your PC.
- Unplug the graphics card.
- Boot your device again.
- Load the Device Manager. Just push the Windows Key on your keyboard, and then enter Device Manager. Open the generated result.
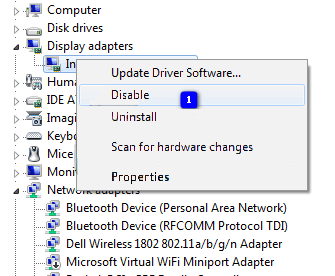
- As soon as you open the generated result, enlarge the Display Adapters.
- Find Intel’s integrated GPU there.
- Click with the right button of the mouse on it. Once you see the dropdown menu, choose Disable.
- The last step from this guide is to shut down your machine once more. Then simply plug your graphics card back in.
When you start your computer again, you should not be experiencing the igdkmd64.sys issue anymore.
Guide #2: How to solve the issue by updating the drivers via Windows’ Force Update
In some cases, using the Force Update could fix the error by getting you the newest drivers. However, what you are supposed to do first is to download everything Windows Update has available for you.
- Hit the Windows key.
- Enter Check for Updates. When there is a result of this search request, load it.
- Push the Check for Updates from there.
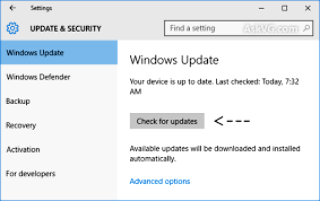
- This should be done as many times as it is necessary. The final message you should see in order to stop doing that is “Your device is up to date“.
- When you have finished with the steps above, load This PC.
- From there go to C:\Windows\SoftwareDistribution\Download. Once there, remove everything from the inside.
- Next you have to enter an Elevated Command Prompt. For that purpose, press both Windows and X at the same time. From the menu that comes up, choose Command Prompt.
Wuauclt.exe /updatenow should be entered in the Command Prompt, followed by pushing Enter. In the end, only a reboot of the system is recommended.
A special tip: In case you are overclocking, stop that!
This solution doesn’t work for everyone. In case you are not aware of the fact that you are overclocking, this will not be the tip for you. Still, if you know that you ARE, proceed with the next paragraph.
Overclocking could result in a serious strain on your CPU, as well as your GPU. This depends on which one exactly you are overclocking. Such issues might result in BSOD with the aforementioned error alert. Our advice is that you attempt to bring everything back to the stock frequencies and voltages. In some particular cases, this might fix the problem.
Guide #3: Maybe setting a new name to “igdkmd64.sys” will help
The instructions below are only compatible with issues of Mac users who use Windows via Bootcamp.
- First of all, look for the .sys file {It is normally found in the Windows folder of the partition where your OS has been installed – within System32 and inside the drivers folder}.
- Choose that file. Right-click on it then. Select the Rename option, after which alter its name to another one like igdkmd64Backup.sys. Save the new name.
The problem should not be present anymore.


Leave a Reply