
If you already have a bootable DVD or UFD (USB flash device), you can use it to repair your OS in case you want to get rid of some nagging error or some more problematic issue. In the following guide we will show you how you can do that.
Repairing PC from bootable DVD/USB flash device
Method 1: In-place upgrade
- Put in the bootable DVD/USB device and open the installation file of the OS.
- In the installation wizard it’s preferable if you choose Download and Install updates. After you choose an option, select Next.

- Accept the License terms and continue.

- Once you get to the Ready to Install window, select Change what to keep, carefully read the options and determine which one suits your needs.
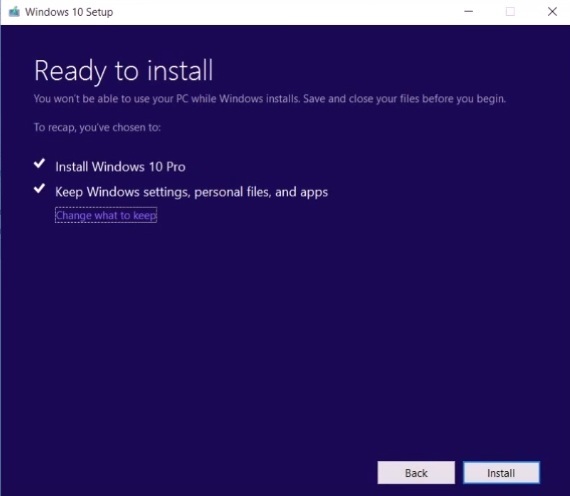

- Initiate the process. Note that it might take a while so be patient.
Method 2: Booting from USB/DVD
Restarting to boot menu
- Put in the DVD/USB device in the drive and shutdown your machine.
- Start your computer and once it turns on and starts loading, you must hit the boot key on your keyboard. The specific key that opens the boot menu varies between different PC/laptop brands and models, so you should better check online what the boot key for your machine is. In most cases it’s F8, F9, F12 or Esc.
- Once you get to to the boot menu, use the arrow keys to move to the Boot tab.
- Now, once again using the arrow keys, highlight the USB: HDD (USB Model name) or the name of the DVD disk with the ISO file and hit F6 until it gets to the top of the list (if it is not already there).

- Use the arrow keys to get to the Exit tab.
- Select Exit Saving Changes, hit Enter and select Yes. Your PC will restart now.
Repairing your OS
- Wait for your PC to restart and once it loads, select your preferred language.
- Next, select Troubleshoot and in the next screen read each option’s description and determine which suits your needs best.
- Keep in mind that Reset your PC will delete any personal data that you might have stored on your hard drive. If you are going for that make sure that you’ve backed up anything you don’t want to lose.

- If you are attempting to repair Windows 7, simply select Repair your computer and follow the prompts.
- Keep in mind that Reset your PC will delete any personal data that you might have stored on your hard drive. If you are going for that make sure that you’ve backed up anything you don’t want to lose.
- Follow the prompts to finish the repair.
- If you’ve chosen Reset your PC, you’ll be asked if you want to repartition the drives. If you want to keep them the way they have been so far, just select No.
- If you’ve chosen to Reset your PC, later you’ll be asked whether to just remove your files or to fully clean the drive. The second option is more secure and effective, but might take quite some time to finish.
- Wait for the repair to finish. After it’s done, you’ll be allowed to set up your OS’ settings in accordance with your personal preferences.


Leave a Reply