
In this guide we’ll talk about using the Check Disk command function in Windows 10/8/7 (also known as chkdsk). It is mainly used for troubleshooting HDD-related problems.
The Check Disk command, also known as chkdsk, is a useful Windows feature that is often used for troubleshooting different errors or other issues with your PC. It scans your drives for any bad sectors and attempts to have them repaired. Bad hard-disk sectors are some of the most common causes for a number of problems, most notably BSOD (Blue Screen of Death) crashes. If you’re currently having such an issue, then using the Check Disk command might help you stop the BSOD from occurring again, if the cause for it has been within your hard-drive. However, know that if your hard-disk is physically damaged, this function will not be effective and will not fix any issues caused by it.
There are two methods, via which you can use the Check Disk command. Here are the guides for them:
Check Disk Command /chkdsk/
The Guide
Method 1: Using Window’s user interface
- Go to Computer/My Computer and right click on the hard-drive that you want to have checked.
- Select Properties and in the resulting window open the Tools tab.
- Click on Check Now.
- Tick both options (Automatically fix file system errors and Scan for and attempt recovery of bad sectors).
- Click on Start and then on Schedule Disk Check.
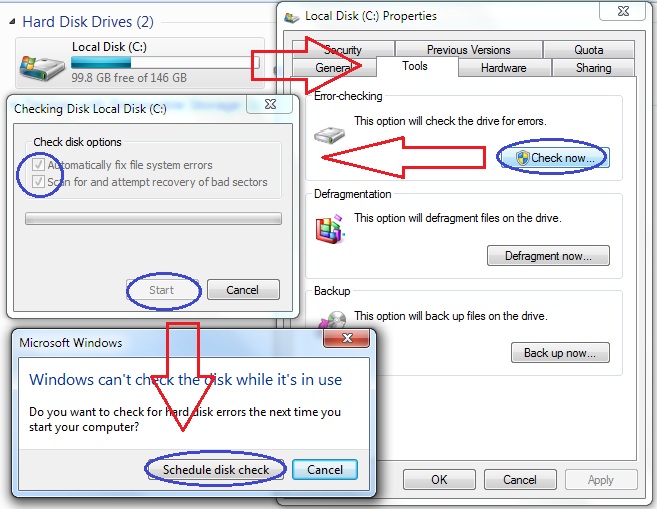
The next time your PC restarts, you will be notified that a Disk Check has been scheduled. You will be given 10 seconds to cancel the check by pressing any key on your keyboard. If you do not press anything, the Disk Check will automatically commence.
Method 2: Using cmd
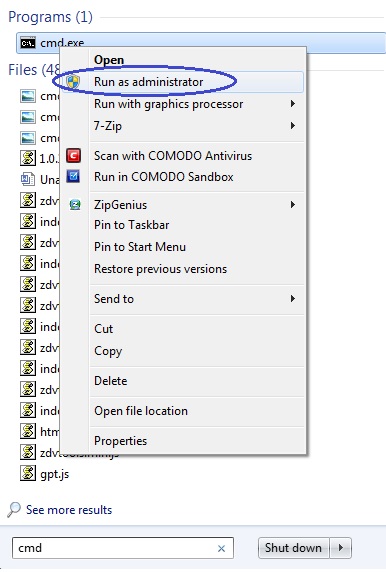
- Open the Start Menu and type cmd.
- Right-click on the first search result and select Run as Administrator.
- In the resulting window, type the following line: chkdsk /f /r C: – this is if you want to have your C: drive checked. If you want Windows to scan any of your other drives, simply replace the C: in the command with the name of the drive you want to check.

- Hit Enter after typing the command. If the drive you want to scan is a system drive or some of its files are currently being used, you’ll be asked to schedule the disk check for the next reboot. To do this, simply type Y in the command line and press Enter again.
How to see if Check Disk has been scheduled and how to cancel it
You can see if a disk scan is scheduled on your PC via another cmd command – chkntfs c:. Type this in the command line and hit Enter and you will be see if Windows will attempt to scan any of your hard-drives the next time your PC boots.

If you want to cancel a disk check, you can do that via the chkntfs /x c: command. Type that in the command line and after pressing Enter, the scheduled disk scan will be canceled. Again, if you want to cancel the disk check for any other drive, replace C: with its name when typing the command in cmd.


Leave a Reply