
Learn how to create a bootable USB/DVD for Windows using the freeware utility Rufus.
How to Create a Bootable USB/DVD
The Guide
This guide will help you create a bootable USB/DVD that you can later use to install the specific OS.
- Download the Windows version you want to upload on the DVD/USB from Microsoft’s official site.
- Important: Make sure that you download the OS in ISO format or else you won’t be able to make the DVD/USB bootable.
- Download a burning program and install it. There are plenty of such tools online, both paid and free.
- For our guide we will be using the program called Rufus. It can burn both DVD disks and UFD’s (USB flash drive).
- Burning the device:
- Get a DVD disk (preferably a double-layered one) or a USB that has at least 8 GB of storage space. Just make sure that whatever you are using, it has enough space for the ISO file of the OS.
- Put the disk inside your DVD drive or the USB flash device inside your USB port.
- Open Rufus and wait until it detects the device (this should happen almost instantly).
- Pick the appropriate device from the drop down menu.
- If not already checked, place a check mark on Create a bootable disk using and set the setting next to it to ISO Image.
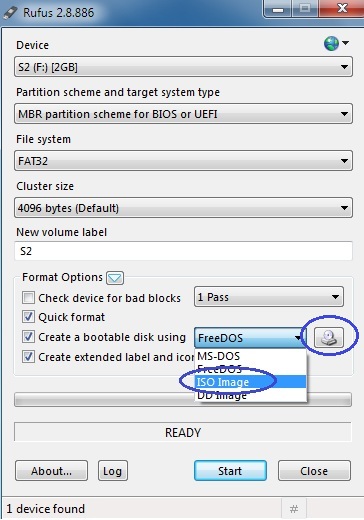
- Click on the disk icon next to ISO Image and find the ISO file of the OS you’ve downloaded earlier. Once you find it, click OK.

- Recommended step: Set the file system to FAT 32
- Click Start and wait for the disk/USB device to be burned.
That’s it! You can also check our guide on how to use the bootable USB/DVD image to repair various problems with Windows here.
For any additional questions please use the comment section below this article. We’ll do our best to aid you, of course, free of charge!


Leave a Reply