This guide aims to help you solve the “Unable to execute file in the temporary directory” installation problem. There are four fixes that we selected for this issue and they work for Windows versions 7, 8 and 10.
Error 5 is a Windows error that may appear when you try to run a setup file. When you attempt to install some software on your computer through an executable installer, you may get a pop-up message, which will inform you about the error and will give you no other option but to dismiss it, this way quitting the installation. It signalizes a problem with your User’s permission and comes with the following error message: “Unable to execute files in the temporary directory”. Such an issue may occur mostly in older versions of Windows like 7 or 8, but even the Windows 10 version is not excluded.
Error 5 is mostly a configuration error, which will make your system block the setup process, rather than a genuine error. That’s why, fixing it has a few possible options, which you can try by yourself to solve your Error 5 – “Denied access” installation problem. Here are four fixes, selected by our team, which may help you do that. Please follow the instructions below and let us know if you find them helpful in the comments.
“Unable to execute file in the temporary directory” Error Fix
Fix 1: Run your system as an Administrator
Trying to run the setup with limited user rights may be the reason for the annoying “Unable to execute files in the temporary directory” message to appear. In this case, to fix it, try to run it with the Administrator rights as shown below:
- First, locate the setup file you want to install.
- Then, right-click on it and select “Run as Administrator” option from the menu. The setup should start without the error message.

Fix 2: Create a new Temp folder and change the variables
Error 5 states that there is a problem with the temporary directory. Having this in mind, you may create a new one and manually change the variables to point that directory. It may solve the issue.
- For that, you will need to go to drive C: (or the drive where your operating system is installed)
- There, create a new folder and name it Temp.

- Next, right-click on “This PC” for Windows 10 or “My Computer” for the other Windows versions and select “Properties”.
- In the Properties menu, on the left side, click on the “Advanced System Settings” to open it.
- Next, click on the Advanced tab and select the Environment Variables

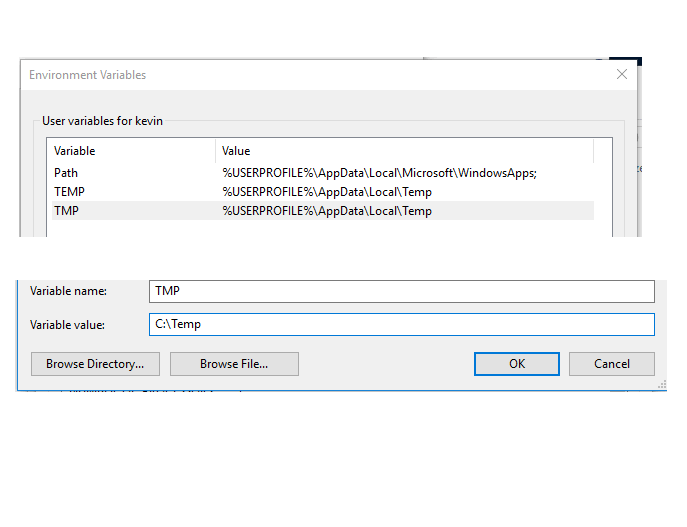
- In the User variables list, double click TMP
- The value that is displayed should be %USERPROFILE%\AppData\Local\Temp.
- Now you will need to change it to C:\Temp.
- Then, close the windows. The setup now should run without problems.

Fix 3: Change the control over the Temp folder
- In the drive where your operating system is installed, find your user’s folder and inside of it locate the “appdata” folder. There should be a local folder. If your Windows is installed on drive C:, this should be the path: C:\Users\User\AppData\Local
- Once there, right-click on the Temp folder inside, and select Properties.
- In the Properties window, select “Security”.
- Then select “Everyone” and click “Edit”
- Ensure that the “Full Control” box is checked, and press OK to save the settings.
By completing this, you will give full control over the Temp folder to all users of the system and this should solve the permission issues with Error 5.
Fix 4: Check “Include inheritable permissions” in the Temp folder
- For this fix, repeat the first three steps from Fix 3 to reach the “Security” tab and next click on “Advanced” to see the permissions.
- There you should find “SYSTEM”, “Administrators”, and “User” permissions. They all should have full control and should be inherited by C:\Users\User
- Look for “Include inheritable permissions” from this object’s parent option.
- Then click on “Continue” and select “Apply” to place the changes.
- At the end, click “OK” to save everything and exit.
- This way, you will now have permissions to write to the directory and solve the Error 5 message.
Solving the Error 5 – “Denied access” message may be a bit tricky for the average user, however, in this guide we did our best to explain a few methods that may help you fix the issue and install your setup. Did you find this helpful? If yes, please, let us know in the comments below.


Leave a Reply