
In this article we’ll teach you how to install Windows on Chromebook. Also included is the list of Windows-compatible Chromebook devices.
Chromebooks are specialized laptops, created to be used with the Chrome OS. This does not mean that it is impossible to install Windows on them. However, it must be noted that Windows is not officially supported on Chromebook computers and installing it on them is considerably more difficult than a Windows install on a regular laptop. Furthermore, depending on the Chromebook model, installing Windows might not always be possible. In the following guide, we will show you how to install Windows on Chromebook. Keep in mind that the process is long and requires several different tasks to be completed prior to the actual OS installation. Overall, it can take up to a few hours, especially if its your first time doing it.
How to Install Windows on Chromebook
The Guide
Determine whether your Chromebook can support Windows
Before you go any further, you should make sure that your Chromebook laptop can support Windows. Not all Chromebooks can support Winodws! A quick online search should yield the results your are looking for. You can also check either the following link that can help you in determining whether a Windows install is possible on your device.
https://coolstar.org/chromebook/windows.html
Only once you have made sure that a Windows installation can be done on your laptop, should you move on to the next steps in this guide.
Manually remove the write-protect screw
In order to get started, you need to first remove a specific screw from your motherboard that prevents the laptop BIOS to be changed (which is one of the next steps in the guide).
- Fully shutdown the laptop.
- Flip it upside down and unscrew the screws that are holding the bottom panel in place and then remove it to reveal the motherboard.
- Now, look around for a screw that is visibly different and sometimes bigger than the others. How it looks and where exactly it is located depends on your model, but it should not be difficult to find. If you are not sure, you can search online for the information that you need.
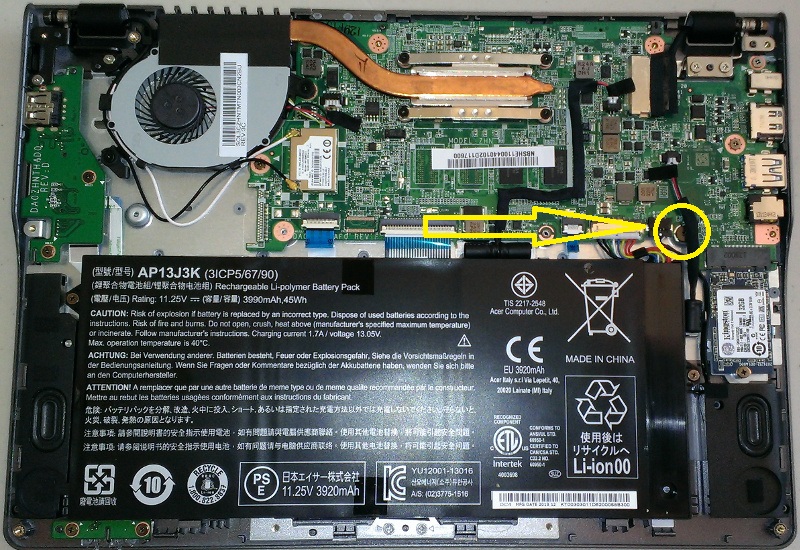
- Once you find the write-protect screw, unscrew it and then put the bottom panel back in place.
Developer Mode
To install Windows, we will need to change the BIOS of your Chromebook and to do that, we need to have the Developer Mode enabled. Here is how to do that:
- With your Chromebook off (but either plugged in or with a fully charged battery), press Esc+Refresh+Power (the Refresh key should be in the place where you would expect the F3 key to be on a regular laptop keyboard).
- The Chromebook should boot showing you this message: Chrome OS is missing or damaged. When this happens, press Ctrl+D and then hit Enter. This will enable the Developer Mode.

- When you do that, your Chromebook will be restored to its original state and default settings and all data stored on the device will be deleted. This should not be a problem with a Chromebook, since any important data should already be saved online. Also, you will need to log back into your Chrome account.
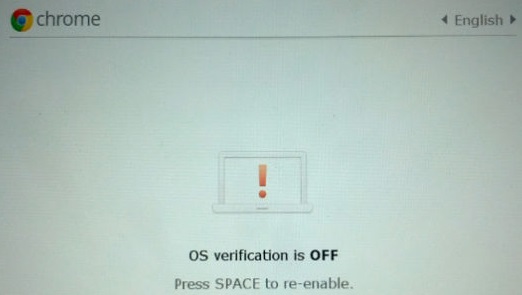
- Once you log in, you will see a message that reads OS verification is OFF. Once again, press Ctrl+D, to close this screen (DO NOT press space).
New BIOS
Your current BIOS needs to be changed, since it has been specially designed to support the Chrome OS and with it, you won’t be able to install Windows.
- Use the Ctrl+Alt+T key combination to access a terminal window.
- Inside the terminal, type Shell and hit Enter.
- Copy-past the following script in the terminal and press Enter again: cd ~; curl -L -O http://mrchromebox.tech/firmware-util.sh; sudo bash firmware-util.sh
- If you need more info on the specific script, you can visit this link.
- When the script loads, you will see a list of options. Choose option number 3 (Install/Update custom coreboot Firmware (Full ROM)) by typing 3 in the terminal and pressing Enter.

- A disclaimer will be displayed and you will be asked whether you are sure you want to continue. Type Y and hit Enter.
- Since you want to install Windows on your Chromebook, type U for UEFI and press Enter again to continue.
- You will be asked if you want to create a backup copy of your Chromebook firmware on an USB drive before continuing. If you want that, type Y. After that, put a empty USB device inside your laptop and press enter to begin the backup process.
- The backup, even though not necessary, is highly advisable, and we recommend doing it.
- Wait for the process to finish. When the backup is ready, the custom Coreboot firmware will begin to download. At this point, you can disconnect the USB.
- Once the Coreboot is downloaded, press Enter to go back to the main menu and then turn off your device.
- Now, you can bring back the write-protect screw if you so desire, though it is not necessary.
Create a bootable USB
Now, that we are ready to install Windows OS on your Chromebook, there is only one thing left to do. You would now need a bootable device, from which you can install the operating system. We recommend using a flash memory drive. Make sure that it has nothing on it and that it has at least 8GB of storage space. Also, you will need a second laptop or a PC to burn the Windows ISO file on the USB device. We have a guide prepared for you, in which we show how to create a bootable USB using a software tool called Rufus. It is a free program that does not require installation and you can download it right now. As for the guide on how to use it, here is a link to that.
Acquire USB keyboard and mouse
There is only one thing left to do before you initiate the installation. Since during the installation process, your Chromebook keyboard and touchpad won’t work, you will need to use separate devices. Therefore, get a USB keyboard and a USB mouse and connect them to the Chromebook before you continue. If you only have a mouse or a keyboard, you can carry out the installation without obtaining the other device, but you must make sure that you have at least one of the two.
Installing Windows
By this point, all preparations for the OS installation should be ready and you should now be able to install Windows on your device. Connect the bootable USB with Windows on it and start your laptop. It should directly boot from the USB and the Windows installation screen must appear. All you need to do now is follow the prompts and install the OS.

Bear in mind that at a certain point during the installation, your Chromebook will restart. When this happens, you’d have to remove the USB or the laptop will boot from it once again and you will get back to the initial installation screen. If this happens, remove the USB and hold the power button until the device shuts down (hard shutdown). Now, wait a couple seconds and press the power button again to start the Chromebook. The installation should now continue from where it stopped before the device restarted. Wait for the process to finish. Now you have successfully installed Windows on your Chromebook.
Finding drivers
You might have completed the Windows installation, but there is still one final step to carry out. Since Chromebooks do not officially support Windows, you cannot rely on the regular drivers that you would otherwise use and install. You will have to find and install third-party drivers instead of the conventional ones and to do that, you will need to enable test signing. Here is what you must do:
- Open the Start Menu and then type cmd.
- Right-click on cmd.exe and then on Run as Administrator.

- Copy-paste the following command and hit Enter: bcdedit -set testsigning on

- Restart the device.
- All you need to do now is go online and search for third-party/unofficial drivers for your system. Just make sure you stay away from any shady and obscure websites or you might end up landing some unwanted or even malicious software. If you are having problems finding the drivers yourself, you can refer to this link – there you should be able to find the proper drivers for your Chromebook with Windows.